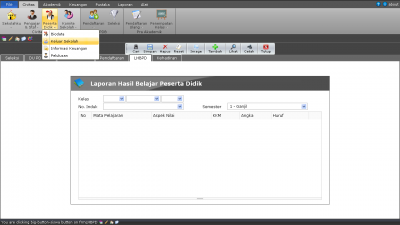
jQuery tabs with ajax history

Selasa, 01 Januari 2013

<html>
<head>
<style>
ul.tab_ajax   {height:5px;; margin:0; padding:0;}
ul.tab_ajax li {float:left; margin:0; padding:0; list-style:none;}
ul.tab_ajax a   {padding:5px 10px; border:1px solid #999; margin-right:2px; text-decoration:none; background:#ccc; color:#FFF; text-shadow:1px 1px 2px #000;}
ul.tab_ajax a.current {color:#333; text-shadow:none; background:#F5F5F5; border-bottom:1px solid #F5F5F5; cursor:default;}

.tab_content   {border:1px solid #999; width:640px; min-height:300px; background:#F5F5F5; padding:5px;}
.tab_content div   {color:#333; font-size:11px;}
</style>
<!-- Panggil Library jQuery dan jQuery tools Library terlebih dahulu-->
<script src="http://cdn.jquerytools.org/1.2.5/full/jquery.tools.min.js"></script>

<script type="text/javascript">
$(function(){
   //menggunakan ajax start function untuk memanggil elemen id loading dan ketika ajax sudah terpanggil elemen id loading disembunyikan
      $('#loading').ajaxStart(function(){
         $(this).fadeIn();   
      }).ajaxStop(function(){
         $(this).fadeOut();
      });
      //tabs menggunakan ajax history
      //di tabs kita, effect nya ditambahkan ajax dan history bernilai boolean
      $("ul.tab_ajax").tabs("div.tab_content > div", {effect: 'ajax', history: 'true'});
});
</script>
<title>Ajax tabs + History</title>
</head>

<body>
<!-- style pada loading di NONE  -->
<h5 id="loading" align="center" style="display:none;">Loading...</h5>
               <ul class="tab_ajax">
                   <li><a href="content.php?q=1">Tutorial terbaru</a></li>
                   <li><a href="content.php?q=2">Tutorial terpopuler</a></li>
                   <li><a href="content.php?q=3">Daftar demo file</a></li>
                </ul>
                <br class="all" />                              
                <div class="tab_content"><div style="display:block;"><!-- content akan diletakan disini--></div></div>
</body>
</html>


content.php:
<?php
$q = $_GET['q'];
if($q==1){ echo 'Halaman pertama';}
elseif($q==2){echo 'Halaman kedua';}
elseif($q==3){echo 'Halaman ketiga';}
else{'Halaman yang anda cari tidak ditemukan';}
?>

Well, we've made a tab with ajax it works and to make the link in a neat lg like twitter you can simply use the htaccess file and change that link target
example: the link popular tutorial we will change it to index.php / #! / popular
htaccess so you have to be changed first.
A simple example:
RewriteEngine On

RewriteRule ^!/populer$ content.php?q=2[L]

that's it. Oh yeah why we added only! It's just not the # as well. Since ajax tabs are automatically fill in each link if it is not changed by htaccess we link to index.php / # content.php? Q = 1 url address so it looks messy (in my opinion anyway). To get the current ajax facebook format is still as above. if twitter is more orderly
and if it is changed in its htaccess file. We also change its link to be
<li><a href="!/populer">Tutorial terpopuler</a></li>

Problem how to pass '#' in url

The problem is that the # character defines an anchor, for example if you were to skip to a specific section on a webpage! I'm not too sure as I have never tried to pass a # as part of a get but there are two ways in which you might be able to do this: firstly and most likely would be to pass the HTML code for the symbol (provided that there is one)

secondly you could try writing it as \# tho I getting doubt that will work!

when I next have access to a computer I'll give it a go and see what o can work out but to be honest I wouldn't be holding my breath!

Show serial number Harddisk with php

script:
<?php
 
function GetVolumeLabel($drive) {
  // Try to grab the volume name
  if (preg_match('#Volume Serial Number is (.*)\n#i', shell_exec('dir '.$drive.':'), $m)) {
    $volname = ' ('.$m[1].')';
  } else {
    $volname = '';
  }
return $volname;
}
 
$serial =  str_replace("(","",str_replace(")","",GetVolumeLabel("c")));
 
echo $serial;
 
?>

Free shopping cart script


  • Best free shopping cart - the free shopping cart script

  • Free shopping cart script is the best free shopping cart for your online store. Start your online store now 100% free of cost. Our free shopping cart comes with paypal integration so that you can post items and get payment easily. Free shopping cart script runs independently on your server. So, no third party dependence. Free shopping cart script comes with features like unlimited products, unlimited category, category specific attributes, unlimited orders, search engine friendly layout and keyword rich URLs, customizable meta-data, customizable color schemes and icons etc (directly from admin panel) and many other features that make creating online store very easy. It is 100% free php script. Download this best free shopping cart now!.
  • No free shopping script comes with all these features that are offered by our best shopping cart script.
  • Download our free shopping script NOW!
    • Unlimited products.
    • Unlimited product categories.
    • Multi level categories.
    • Additional product attributes (like color, size etc.)
    • Unlimited orders.
    • Paypal enabled.
    • Script runs independently on your server.
    • No third party dependence.
    • Unlimited color themes.
    • Unlimited customizable icons.
    • Product search
    • Advanced product search
    • Shipping charges, handling changes and tax management
    • Image gallery with each product
    • Spam protection (form captchas)
    • Ad manager
    • Supports banner and text ads
    • Google ad support
    • Latest products section
    • Featured products section
    • Email alerts
    • Image thumbnails for fast browsing
    • Add watermark to images
    • Support for paypal 2CO and offline payments
    • Get the best free shopping cart TODAY
    • What's best time to download free shopping cart script? It is now.
    • Check full online demo NOW for full features of free shopping script.
     
  • Download
  • free script

Altova® XMLSpy® - The industry's leading XML editor!


Whether you're new to XML or already an advanced user, the user-friendly views and powerful entry helpers, wizards, and debuggers in XMLSpy are designed to meet your XML and Web development needs from start to finish. New features in Version 2013!
  • XML editor
  • Graphical XML Schema / DTD editors
  • Smart Fix XML validation with automatic error correction
  • XSLT 1.0/2.0 editor, debugger, profiler
  • XQuery editor, debugger, profiler
  • XBRL validator, taxonomy editor, taxonomy wizard
  • New! Chart creation for XML data
  • Support for Office Open XML (OOXML)
  • Graphical WSDL 1.1/2.0 editor & SOAP debugger
  • JSON editing & conversion
  • Java, C#, C++ code generation
  • 32-bit and 64-bit versions
  • HTML5 and CSS3 support
Download a free trial today!
 Altova XMLSpy

Stop Guestbook SPAM


BY:Klemen Stirn

Guestbook spam is simply a phrase for advertising messages that people submit in your guestbook. Spammers submit the same message with the link to their website in numerous guestbooks hoping for some clicks and links indexed by search engines. You can recognize spam by completely irrelevant, general or promotion messages always accompanied by URL of a website. Most of the time messages explain how good your site is, for example:
Sweet page! I think it's cool! Visit my site http://www.??????.??
Spammers usually use some kind of software that automatically submits their messages to hundreds of guestbooks. They never actually open or look at your website, only the software sends their spam to your guestbook script.
The bottom line is guestbook spam is very annoying and can completely overflow your guestbook and make it practically unusable (who want's to have their guestbook full of messages saying buy pills, drugs and stuff?). In fact I know quite a few webmasters who disabled their guestbook after being spammed again and again and again.
  • Security image aka CAPTCHA
  • Logical question
  • JunkMark™
  • Disable posting URLs
Let's say a few words about each of these measures.

CAPTCHA

This is a generated image showing a 5-digit number that changes every time someone wants to post a message. In order to successfully submit a new guestbook entry the visitor needs to type in the correct number.
Guestbook CAPTCHA
In the above example one would have to type 94740 into the box to submit a message. Like I said the security number changes every time you try to post a message. Using this simple check GBook prevents automated signups by spam software.

Logical question

While a CAPTCHA can be effective against simple SPAM programs the problem is more complex software can read the number from the image. There are also accessibility issues to be considered - visually impaired people for example can't read CAPTCHAs and therefor can't submit forms using them.
As an alternative GBook comes with an option to setup a logical question that is easy to solve for a human, but can be a huge problem for a computer program. You can set up questions like "What color is snow?" (answer: white), or an even simpler question like the one below:
Guestbook CAPTCHA
Similalry as with CAPTCHA, the visitor needs to type human into the appropriate box to submit a comment.

JunkMark™

CAPTCHAs and logical questions are effective methods to combat SPAM, but what if a spammer doesn't use software to submit SPAM and actually visits your guestbook? In this case he/she is still able to get pass it and submit his/her spam.
This is where JunkMark™ comes in. It's a unique tool designed to additionally filter the SPAM that slips through the security image. It comapres submitted information against certain patterns and words to recognize advertising messages. For obvious reasons I can't give out any details about how this filter works, but it does the job and it does it good.

Disable posting URL addresses

By default GBook will block any comment that includes website URLs. The philosophy behind this is simple: the purpose of a guestbook is letting people post a comment about YOUR website and not invite people to visit THEIR website. Since no URLs can be posted it will scare away spammers as well.
The URL field can be enabled easily in the settings if you wish to include it anyway, but leaving it disabled is an effective trick against guestbook spam!

How effective is GBook at fighting guestbook spam?

This is something I have been asking myself, so I decided to make a little test. I edited the demo guestbook on my site to log all posts in a special file, even those who don't pass the security number check. Then I ran the test for 24 hours (on January 26th, 2006) and the results were astonishing!
Within 24 hours no less than 143 spam messages were blocked!
Yes, if I disabled the security check my demo guestbook would have been spammed with 143 messages in a single day! The guestbook would have been a mess by now!

Conclusion

Guestbook spam is a very annoying way of advertising, but with proper filters it can be reduced to a minimum. If your guestbook is having problems with spam I suggest you give my PHP guestbook script GBook a try, it does help! And it's free!
source:phpjunkyard

PHP Redirect 301 permanently

Sometimes you might want to redirect your visitors to a new URL address. This article will show you how to make a PHP redirect using the 301 "moved permanently" redirection. This is the one you should use as it is the most search engine friendly. Like the name suggests, PHP redirect tells the browser (or a search engine bot) that the page has been permanently moved to a new location.

PHP Redirect Code

To redirect people and robots to a new location use this PHP redirecting code:
<?php 
header
("HTTP/1.1 301 Moved Permanently"); header("Location: http://www.New-Website.com"); ?>
Tip: use lower-case name for the header function (not Header) to make sure your PHP redirect code is compatible with PHP 6.

You could skip the 301 Moved Permanently tag and use just:
<?php 
header("Location: http://www.New-Website.com"); ?>
But this would result in a "302 Moved Temporarily" redirect instead of a 301 one. This should be avoided as permanent redirects are more search engine friendly and should be used where possible.

You can enter any sub-page for the location, this PHP code will redirect users to the test.php sub-page of your website:
<?php 
header
("HTTP/1.1 301 Moved Permanently"); header("Location: http://www.New-Website.com/test.php"); ?>

It is important that you don't have any other code (including empty rows and spaces) before the above PHP redirect code. If you do you will get a nice headers already sent notice from PHP and the redirect will not work.

Message board script


Message Board

MBoard is a PHP message board script - a simple forum. It is ideal for webmasters who don't need or want big (and usually empty) forums on their sites, but are instead looking for a smaller, simple yet effective message board.
This message board doesn't require any SQL databases. It stores all posts as HTML pages so it doesn't take up much of the server resources (what is usually the case with larger flat-text database message boards) so it is ideal for shared hosting. Features include support for smileys, instant "New post" notification, easy deletion of inappropriate posts etc. It even comes with a bad words filter which replaces all bad words with **** in new posts and a powerful SPAM filter.
You can completely customize the look of the message board by editing header, footer and style files 

inochi ribbon


New "INOCHI Ribbon"
Akhirnya, INOCHI mempersembahkan inochiRibbon
Fitur:
ribbonTabs
Menentukan tab-tab apa saja pada ribbon
ribbonGroups
Menentukan grup-grup pada ribbon
ribbonButtons
Menentukan item-item pada ribbon, item ini berupa: button (big/small) dengan tipe single/popup/split-popup, label, textbox, checkbox, dan custom item.
statusBar
Menentukan item-item pada statusbas, item ini berupa: button single small dan label
quickBar
Menentukan item-item pada quickbar, item ini berupa: button single small
upButtons
Menentukan item-item pada tab ribbon, item ini berupa: button single small yang terletak pada sisi kanan tab ribbon
buttonFileStandard
Menentukan button standard pada page ribbon file
buttonFileFull
Menentukan button long pada page ribbon file, digunakan untuk menampilkan sub halaman dari page ribbon file
logo
Menentukan logo pada tengah-tengah halaman
theme
Menentukan theme ribbon, disediakan dua jenis theme, yaitu: black dan blue
onClick
Menentukan event klik dari masing-masing item
selectedTab
Menentukan tab ribbon yang pertama kali dipilih
quickBarPos
Menentukan posisi quickbar, dengan pilihan: 0 - posisi di atas ribbon dan 1 - posisi di bawah ribbon
toolBar
Menentukan tombol-tombol pada toolbar
tooltip
Menentukan tool-tip untuk tiap-tiap item
cornerButton
Menentukan tombol di sudut kanan bawah ribbon group

Sudah diuji pada browser Firefox, Internet Explorer 7, dengan hasil memuaskan. Jika ada yang telah menguji pada Google Chrome dan Opera, mohon informasinya.

code untuk index.php
<!DOCTYPE html>
<html>
<head>
<meta http-equiv="Content-Type" content="text/html; charset=utf-8" />
<title>INOCHI Ribbon</title>
<script type="text/javascript" src="scripts/jquery-1.6.2.min.js"></script>
<script type="text/javascript" src="scripts/tinybox.js"></script>
<script type="text/javascript" src="scripts/jquery.alerts.js"></script>
<script type="text/javascript" src="scripts/inochi.ribbon.js"></script>
<script type="text/javascript" src="scripts/inochi.js"></script>
<script type="text/javascript">
$(function(){
$("#page").inochiRibbon({
theme: "blue",
logo: "forms/frmLogo.php",
selectedTab: 1,
quickBarPos: 1,
quickBar: [
//Add quickbar button
{name:'save'},
{name:'folder'},
{name:'info', form: 'frmAbout'},
{name:'exit'}
],
upButtons: [
//Add button on ribbon-tab (right side)
{name:'help', caption: ''},
{name:'about', caption: 'About', form: 'frmAbout'}
],
ribbonTabs: [
//Add ribbon tab
{caption: 'Home'},
{caption: 'Profile'}
],
ribbonGroups: [
//Add group ribbon
{tabno:1, name:'clipboard', caption: 'Clipboard', cornerButton: true,
tooltip: [
{title: "Clipboard", content: "<table><tr>" +
"<td><img src=images/clipboard.png /></td>" +
"<td style=width:200px>Show the clipboard task</td>"+
"</tr></table>"}
]},
{tabno:1, name:'database', caption: 'Database'},
{tabno:1, name:'show', caption: 'Show'},
{tabno:1, name:'text', caption: 'Text'},
{tabno:2, name:'other', caption: 'Other'}
],
ribbonButtons: [
//Add button on ribbon
{group:'clipboard', name:'paste', caption: 'Paste', size:'big', type:'split',
popups:[
{name:'pasteall', caption: 'Paste All'}
],
tooltip:[{title:"Paste", content: "Paste the contents of the clipboard"}]
},
{group:'clipboard', name:'cut', caption: 'Cut', size:'small',
tooltip:[{title:"Cut", content: "Cut the selection and put it on the clipboard"}]},
{group:'clipboard', name:'copy', caption: 'Copy', size:'small',
tooltip:[{title:"Cut", content: "Copy the selection and put it on the clipboard"}]},
{group:'clipboard', name:'copyformat', caption: 'Format Painter', size:'small',
tooltip:[{title:"Format Painter", content: "Copy formating from one place and apply it to another"}]},
{group:"show", name:"ruler", caption: 'Ruler', size:'small', type:'checkbox'},
{group:"show", name:"gridlines", caption: 'Gridlines', size:'small', type:'checkbox'},
{group:"show", name:"navigation", caption: 'Navigation Pane', size:'small', type:'checkbox'},
{group:"text", name:"info", caption: 'Info', size:'small', type:'label'},
{group:"text", name:"yourname", caption: 'Name', size:'small', type:'textbox'},
{group:"text", name:"address", caption: 'Address', size:'small', type:'textbox'},
{group:"database", name:"database", caption: 'Database', size:'big',
popups:[
{name:'backup', caption: 'Backup'},
{name:'restore', caption: 'Restore'}
],
tooltip:[{title:"Database", content: "Backup or restore database"}]},
{group:'database', name:'other', caption: 'Other', size:'small', type: 'split',
popups:[
{name:'folder', caption: 'Folder'},
{name:'user', caption: 'User'},
{name:'book', caption: 'Book', form: 'frmBook'}
],
tooltip:[{title:"Database", content: "database"}]},
{group:"other", name:"folder", caption: 'Folder', size:'big'},
{group:"other", name:"user", caption: 'User', size:'big'},
{group:"other", name:"book", caption: 'Book', size:'big', form: 'frmBook'},
],
toolBar: [
//Add button on tool bar
{name:'find', caption: 'Find'},
{name:'save', caption: 'Save'},
{name:'delete', caption: 'Delete'},
{name:'reset', caption: 'Reset'},
{style: '|'},
{name:'add', caption: 'Add'},
{style: '|'},
{name:'view', caption: 'View'},
{style: '|'},
{name:'print', caption: 'Print'},
{style: '|'},
{name:'close', caption: 'Close', act: 'close'}
],
buttonFileStandard: [
//Add button standard on File page
{name:'save', caption: 'Save'},
{name:'folder', caption: 'Open'}
],
buttonFileFull: [
//Add button full/long on File page
{name:'option', caption: 'Option'},
{name:'recent', caption: 'Recent'}
],
statusBar: [
//Add button on status bar
{name:'save', caption: ''},
{name:'folder', caption: ''},
{name:'panelStatus', caption: '&nbsp;', type:'label', width: 200},
],
onClick: function(obj){
var btnID = $(obj).attr('id');
switch(btnID){
case "big-button-paste":
msgBar('Info', 'Your click Paste Button');
break;
case "file-button-full-option":
var strContent = "<h2>INOCHI Ribbon</h2><br/>";
strContent += "Copyright &copy; 2011 <a href='http://www.agungnovian.com' target='_blank'>AgungNovian.com</a><br/>";
strContent += "<br/>Contact: <a href='mailto:pujanggabageur@yahoo.com'>pujanggabageur@yahoo.com</a>";
$('.file-panel-right').html(strContent);
break;
default:
$('.file-panel-right').html("");
var selectedForm = $("#txtFrmSelected").val();
$("#panelStatus").html('You are clicking ' + btnID + ' button on ' + selectedForm);
break;
}
}
});
});
</script>
</head>
<body>
<div id="page">
<!-- silent is gold -->
</div>
</body>
</html>


download: http://www.i-bego.com/download/file.php?id=152
by:i-bego